


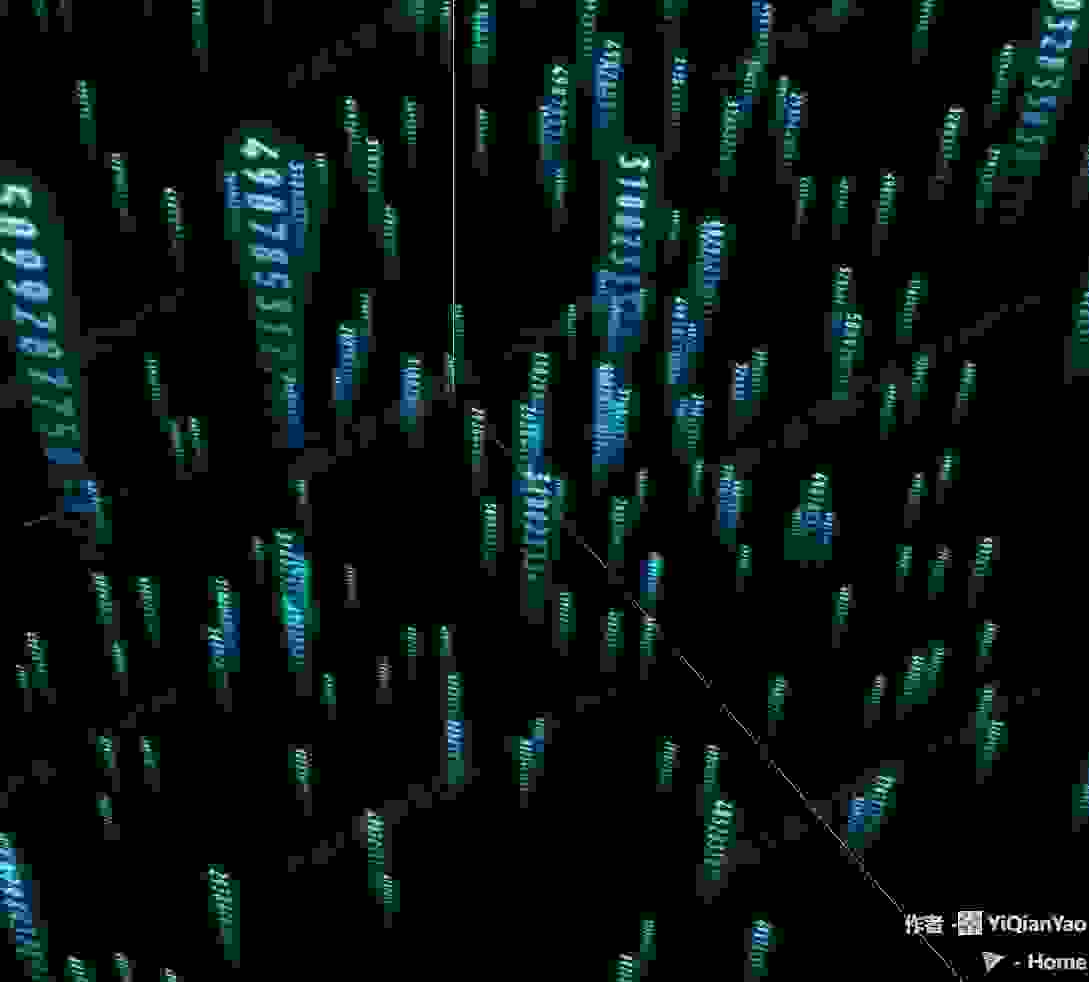
📷 代码云
提示词
使用Three.js的ShaderMaterial创建代码云效果,通过多个代码纹理的随机切换和下落动画,实现代码雨的视觉效果。
效果拆解
| 效果 | 实现方式 |
|---|---|
| 代码纹理 | 加载多个代码图片作为纹理 |
| 随机切换 | 在着色器中根据随机值选择不同纹理 |
| 下落动画 | 在渲染循环中更新代码块位置 |
| 相机跟随 | 代码块始终面向相机 |
| 循环效果 | 代码块落到底部后重新回到顶部 |
| 随机更新 | 定期更新随机值改变纹理选择 |
核心技术点
1. 着色器材质创建
JAVASCRIPT
1
2
3
4
5
6
7
8
9
10
11
12
13
14
15
16
17
18
19
20
21
22
23
24
25
26
27
28
29
30
31
32
33
34
35
36
37
38
39
40
41
42
43
44
45
46
47
48
49
50
51
52
53
54
55
56
57
58
59
60
61
62
63
64
65
66
function initMaterial() {
  let loader = new THREE.TextureLoader()
  return new THREE.ShaderMaterial({
    uniforms: {
      texture1: { value: loader.load(FILE_HOST + 'application/codeCloud/1.png') },
      texture2: { value: loader.load(FILE_HOST + 'application/codeCloud/2.png') },
      texture3: { value: loader.load(FILE_HOST + 'application/codeCloud/3.png') },
      texture4: { value: loader.load(FILE_HOST + '/threeExamples/application/codeCloud/4.png') },
      texture5: { value: loader.load(FILE_HOST + '/threeExamples/application/codeCloud/5.png') },
      texture6: { value: loader.load(FILE_HOST + '/threeExamples/application/codeCloud/6.png') },
      texture7: { value: loader.load(FILE_HOST + '/threeExamples/application/codeCloud/7.png') },
      texture8: { value: loader.load(FILE_HOST + '/threeExamples/application/codeCloud/8.png') },
      texture9: { value: loader.load(FILE_HOST + '/threeExamples/application/codeCloud/9.png') },
      random: { value: Math.random() }
    },

    vertexShader: `
      varying vec2 vUv;
      void main() {
        vUv = uv;
        gl_Position = projectionMatrix * modelViewMatrix * vec4(position, 1.0);
      }
    `,
    fragmentShader: `
      varying vec2 vUv;
      uniform sampler2D texture1;
      uniform sampler2D texture2;
      uniform sampler2D texture3;
      uniform sampler2D texture4;
      uniform sampler2D texture5;
      uniform sampler2D texture6;
      uniform sampler2D texture7;
      uniform sampler2D texture8;
      uniform sampler2D texture9;

      uniform float random;

      void main() {
        float selfRandom = vUv.y - fract(vUv.y);
        float k = abs(sin(selfRandom * random))*10.0;

        if(k < 1.0) {
          gl_FragColor = texture2D( texture1, vec2(fract(vUv.x), fract(vUv.y)));
        } else if(k < 2.0) {
          gl_FragColor = texture2D( texture2, vec2(fract(vUv.x), fract(vUv.y)));
        } else if(k < 3.0) {
          gl_FragColor = texture2D( texture3, vec2(fract(vUv.x), fract(vUv.y)));
        } else if(k < 4.0) {
          gl_FragColor = texture2D( texture4, vec2(fract(vUv.x), fract(vUv.y)));
        } else if(k < 5.0) {
          gl_FragColor = texture2D( texture5, vec2(fract(vUv.x), fract(vUv.y)));
        } else if(k < 6.0) {
          gl_FragColor = texture2D( texture6, vec2(fract(vUv.x), fract(vUv.y)));
        } else if(k < 7.0) {
          gl_FragColor = texture2D( texture7, vec2(fract(vUv.x), fract(vUv.y)));
        } else if(k < 8.0) {
          gl_FragColor = texture2D( texture8, vec2(fract(vUv.x), fract(vUv.y)));
        } else {
          gl_FragColor = texture2D( texture9, vec2(fract(vUv.x), fract(vUv.y)));
        }
      }
    `,
    depthWrite: false,
    transparent: true
  });
}
2. 代码云创建
JAVASCRIPT
1
2
3
4
5
6
7
8
9
10
11
12
13
14
15
16
17
18
19
20
21
22
23
24
25
cloud = new THREE.Group()
scene.add(cloud)
shader_material = initMaterial()

let width = 128, height = 128

for (var i = 0; i < 1000; i++) {
  var pos = new THREE.Vector3(
    Math.random() * range - range / 2,
    Math.random() * range - range / 2,
    Math.random() * range - range / 2
  )

  pos.vX = ((Math.random() - 0.5) / 3) / 10
  pos.vY = (0.05 + Math.random() * 0.1) / 5

  let geometry = new THREE.PlaneGeometry(4, 4);
  let s = Math.floor(Math.random() * 1000) + 1
  geometry.attributes.uv.array = geometry.attributes.uv.array.map(e => e += s)

  var plane = new THREE.Mesh(geometry, shader_material);
  plane.position.copy(pos)
  plane.userData.pos = pos
  cloud.add(plane)
}
3. 随机值更新
JAVASCRIPT
1
2
3
4
5
6
7
setInterval(() => {
  if (cloud) {
    cloud.children.map(plane => {
      plane.material.uniforms.random.value = Math.random()
    })
  }
}, 100)
4. 动画更新
JAVASCRIPT
1
2
3
4
5
6
7
8
9
10
function snowanimate() {
  if (cloud) {
    cloud.children.map(plane => {
      plane.rotation.y = camera.rotation.y
      let pos = plane.userData.pos
      plane.position.y += pos.vY
      if (plane.position.y >= range / 2) plane.position.y = -range / 2
    })
  }
}
调试技巧
- 代码块数量:调整循环次数控制代码块密度
- 下落速度:修改vY的值调整下落速度
- 纹理切换:调整random的更新频率改变纹理切换速度
- 代码块大小:调整PlaneGeometry的尺寸改变代码块大小
扩展思路
- 颜色变化:为不同代码块添加不同的颜色
- 交互效果:鼠标悬停高亮显示代码块
- 音频响应:根据音频节奏改变下落速度
- 3D效果:添加旋转和透视效果
- 代码高亮:实现语法高亮效果
- 搜索功能:添加搜索特定代码的功能

💬 评论区
评论功能即将上线,敬请期待!