Three.js UV图像变换
提示词
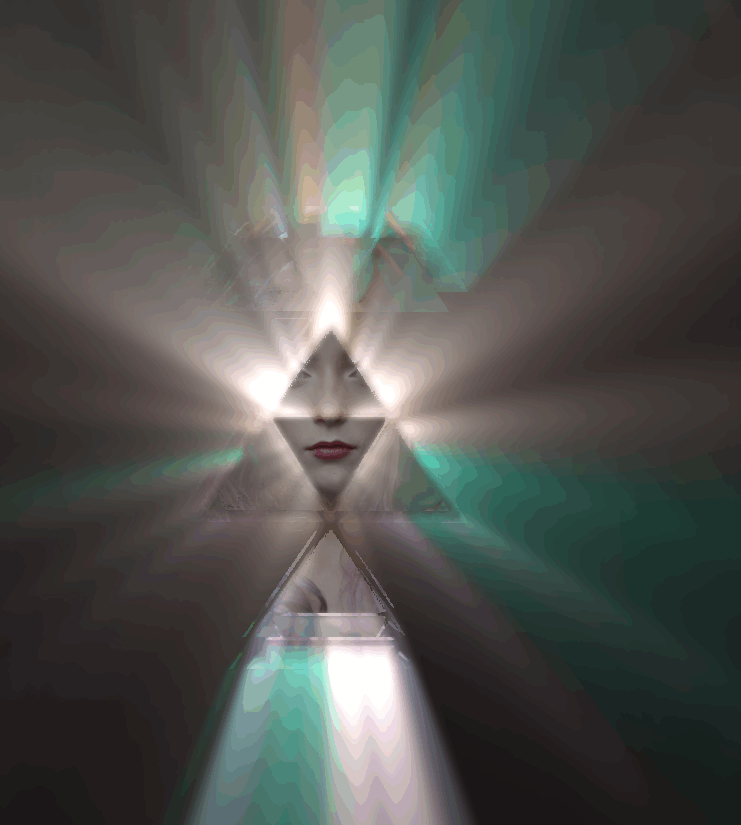
使用 Three.js 和 postprocessing 库创建 UV 图像变换效果,使用 GodRaysEffect 实现光晕效果。
效果描述
这是一个展示如何创建 UV 图像变换效果的示例,使用 GodRaysEffect 实现光晕效果。
效果特性
- UV变换:UV 坐标变换
- 光晕效果:使用 GodRaysEffect
- 纹理动画:纹理偏移动画
- 透明度测试:alphaTest 透明度测试
- 重复纹理:纹理重复设置
- 后处理:使用 EffectComposer
核心参数
| 参数 |
值 |
说明 |
| 光晕密度 |
1.0 |
光晕密度 |
| 光晕衰减 |
0.96 |
光晕衰减 |
| 光晕权重 |
1.0 |
光晕权重 |
| alphaTest |
0.15 |
透明度测试 |
| 纹理重复 |
(0.6, 2) |
纹理重复 |
核心代码解析
创建场景和材质
1
2
3
4
5
6
7
8
9
10
11
12
13
14
15
16
17
18
19
20
21
22
23
24
25
26
27
28
29
30
31
const image_url = FILE_HOST + "images/effectComposer/photo-1583766395091-2eb9994ed094.avif";
const image_ratio = 687 / 1031;
const image_tex = new THREE.TextureLoader().load(image_url);
image_tex.repeat.set(1, 1);

const alpha_url = FILE_HOST + "images/effectComposer/photo-1510942752400-ebce99a8a2c0.avif";
const alpha_tex = new THREE.TextureLoader().load(alpha_url);
alpha_tex.repeat.set(0.6, 2);
alpha_tex.offset.x = (1 - alpha_tex.repeat.x) / 2;
alpha_tex.wrapT = THREE.RepeatWrapping;

const geom = new THREE.PlaneGeometry(image_ratio * 2, 2);
const mat = new THREE.MeshLambertMaterial({
    alphaMap: alpha_tex,
    alphaTest: 0.15,
    map: image_tex,
});
const mesh = new THREE.Mesh(geom, mat);
scene.add(mesh);

const wall = new THREE.Mesh(
    geom,
    new THREE.MeshBasicMaterial({
        alphaMap: alpha_tex,
        alphaTest: 0.15,
        map: image_tex,
    })
);
wall.scale.setScalar(1.2);
wall.position.z = -0.1;
scene.add(wall);
创建后处理效果
const composer = new EffectComposer(renderer);
const renderPass = new RenderPass(scene, camera);
const effect = new GodRaysEffect(camera, wall, {
    density: 1,
    decay: 0.96,
    weight: 1,
});
const effectPass = new EffectPass(camera, effect);
composer.addPass(renderPass);
composer.addPass(effectPass);
动画渲染
renderer.setAnimationLoop((t) => {
    composer.render();
    controls.update();
    alpha_tex.offset.y = t * -0.001;
});
技术亮点
- UV变换:UV 坐标变换
- 光晕效果:使用 GodRaysEffect
- 纹理动画:纹理偏移动画
- 透明度测试:alphaTest 透明度测试
- 后处理:使用 EffectComposer
调试技巧
- 光晕密度:调整光晕密度改变光晕强度
- 光晕衰减:调整光晕衰减改变光晕范围
- 光晕权重:调整光晕权重改变光晕亮度
- alphaTest:调整 alphaTest 改变透明度
- 纹理重复:调整纹理重复改变纹理效果
扩展方向
- 更多效果:添加更多后处理效果
- 交互控制:添加交互控制
- 动画效果:添加动画效果
- 多种纹理:使用多种纹理
- 自定义效果:自定义后处理效果
本文档由 ThreeLab 编辑整理,如需转载,请注明出处。


💬 评论区
评论功能即将上线,敬请期待!